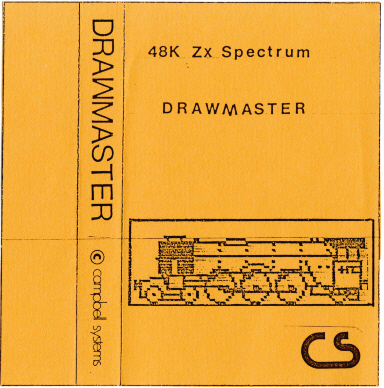
Drawmaster
Utility: Graphics · ZX-Spectrum 48K · 1 players · English
Campbell Systems · 1983 · Pound sterling 6.95
Discussion
Nobody has started a thread about this yet.
Remarks
graphics toolkit
Releases
- 1983Campbell SystemsPound sterling 6.95
- 1983Aackosoft
- 1988Kellydata
Play
- Drawmaster.tzx.zipTape image English7 KB
- Drawmaster.tap.zipTape image English7 KB
- Drawmaster(Aackosoft).tzx.zipTape image English7 KB
- Drawmaster(Kellydata).tzx.zipTape image English7 KB
Documents
- Drawmaster.pdfInstructions English728 KB
Files and rights
Distribution permission is on record, granted to another archive rather than to this one. Screens and pictures are copied here; everything else links to the archive that holds it.
- AllowedCampbell Systems → WorldOfSpectrum
In the magazines 17
Your Spectrum #8Oct 1984 · p.38
Peter Freebrey
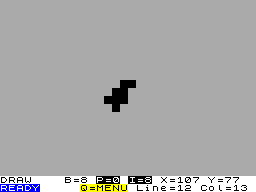
ART FOR ART'S SAKE There are many graphics toolkits available on the market, each claiming to give the Spectrum the commands it needs to become a 'true' artist. Peter Freebrey finds out if they left the drawing board too soon... Many of the programs now available for the Spectrum have quite amazing title pages and graphics within the program. But, wonder not, for with a fair amount of preparation and care, you too can produce similar effects. That's where graphics toolkits come in. They appear in a number of different guises, but the main reason for our interest is that they all cut down the level of work involved in creating a picture on the screen. They fall into one of two main kinds - those that enable you to draw lines, shapes, blocks of colour and dots anywhere on the screen, and those that provide a simple way of creating your own user-defined graphics; some of these toolkits provide both within the one package. Judging packages against one another is no easy task - because each of the better utilities offers something that the others don't. Either one has to wait for a package that includes all the facilities listed here (unlikely), or else you'll have to choose the one that offers what seems most suited to your present needs. In fact, there's a great deal to be said for having more than one toolkit; that way, with a little care, you can always SAVE from one and LOAD into another - perhaps to take advantage of a specially needed routine. 48K MELBOURNE DRAW Melbourne House £14.95 Although one or two graphics toolkits had appeared before this one was launched, none ever got the widespread publicity of this particular package. Melbourne Draw has now had well over a year to make its mark and it's gained the reputation of being a most effective utility. LOAD it and the program will auto-RUN and display the main menu. This offers several options enabling you to LOAD previously developed pictures or user-defined graphics (UDGs), edit a picture, and also to SAVE and VERIFY. Select 'edit picture' and you're presented with a black screen area - plus a two-line information window at the bottom of the screen. This tells you the current 'mode' (Skip, Set, Reset, Invert, Scroll or Text); you're also told whether you are editing 'screen' or 'attributes'. Below these are two numbers representing the x and y coordinates of the cursor. The numbering system used is identical to that of the Basic PLOT command, even allowing access to the bottom two lines of the screen (so that the bottom left corner coordinates are x=0, y=-16); should you wish to use these two lines, the information window can be moved to the top of the screen. During a Fill command, the window is removed to allow complete filling of any shapes within the window area. To the right of mode and co-ordinates is a four-character block, indicating the degree of magnification you are using. Finally, to the right of this is the section indicating the current INK, PAPER and attribute information. The first step is to clear the screen... that way you can see what you're doing! 'Clear' options (Paper, Ink, Both, Screen, All or None) are activated by Shift (either Caps or Symbol) and the 'R' key. Generally Melbourne Draw is pretty user friendly, although initially, with all the commands to remember, it may seem otherwise! But even then there is help because Melbourne has thoughtfully listed all the commands and their actions on the back cover of the instruction booklet... yes, it's definitely user friendly. Once you've cleared the screen you'll be left with a one-pixel flashing cursor that's roughly in the middle of the work area. This can be moved in any of eight directions using the block of keys under 'Q-W-E'. Pressing Enter will implement the Set mode and if you now move the cursor, a line will be drawn on the screen. Space activates Skip mode - no pixels set; the 'O' key lets you Reset pixels you've Set by mistake. Pressing the 'G' key puts a grid pattern over the screen, enabling you to align any shapes with attribute cells (you may wish to colour consecutive cells differently). The 'M' key magnifies your working image two times, and pressing 'M' again gives you another two-times magnification. This is particularly useful for fine detail and it's also very handy when you're designing UDGs. Melbourne Draw has the novel facility of allowing you to convert any character square (shown by the 'grid' pattern) to a UDG (normally restricted to the Spectrum allocation of keys 'a' to 'u'). Thus, at maximum magnification you have a display of eight by five cells showing. You can create a picture on it and conconvert 21 cells to UDGs, either for use elsewhere in your picture or for use within other programs. You're also given the data for each, should you want to record it for future use. The user can scroll the display in any direction and print text to any character square. The direction that the text is printed can be rotated; that means if you want a word reading down the screen with the letters on their sides, there's no awkward positioning to deal with. Just specify the direction in which text is to be written and key in your characters; UDGs can be dealt with in the same way. Finally, the display can be reversed left to right. Side two of the cassette has several Melbourne House title pages for you to LOAD, alter and otherwise play/learn from. PAINTBOX Print 'N' Plotter Products £9.95 LOAD Paintbox and it'll autoRUN to display the main menu. This serves up a choice of three options: UDG Editor, Precision Plotter and Screen Planner. Opt for UDG Editor and you're given a further menu which allows you to view existing UDGs, create new UDGs (using Paintbox's Drawing Board) or to go to Sketch Pad. Other options allow for LOAD or SAVE of UDGs from/to tape, the final one being to return to the main menu. Option 1 - View UDG Banks - displays four sets of UDGs already in memory; you can choose one of these for use with further options. The four banks are (a) a submarine, (b) a warship, (c) aircraft and (d) buildings, trees and vehicles. Also displayed are any UDGs you've already created using option 2 - Drawing Board. This gives you an eight by eight box within which to create your own UDG characters; you can call from one of the banks of UDGs, or you can call a keyboard character and alter that. Designs can be drawn using either the cursor keys or a Kempston Joystick. Once you ve opted to call a character to create or alter, there's no return... you must then create something, even if it's only a space; there's no way you can break out of this part of the program. Having produced your character, you're then given the opportunity of creating an inverse copy, a mirror image - or even of rotating it through 90 degree steps; whatever it is, just file the result in the bank of UDGs you're working with. There are four banks of 21 UDGs, so it's possible to create a total of 84 different graphic designs; the instructions tell you all you need to know about using banks of UDGs within your own Basic programs. The Sketch Pad option gives you a six by 30 cell (work area) together with a display of existing UDGs. Here you can try various combinations of UDGs (out of any bank of 21) to see what they look like; if you're planning to use several linked together, make sure they're in the same bank! The next selection from main menu is the Precision Plotter. You're given the choice of keyboard cursor keys or, again, the Kempston Joystick, and from there you can either start from a blank screen or LOAD a previous file from tape. First choose INK and PAPER colours - then the decision is yours whether to create a new picture, or return to one held in memory. The cursor keys give movement in four directions. Key 'Q' PLOTs a single pixel point and 'W' DRAWs a line from the end of a previous line or pixel point plotted; key 'E' will Erase the last command and 'F' will Fill with the current INK colour. Fill often misses out portions of the screen so you may have to recall it to fill in the 'holes'. Paintbox also supports Circle ('H') and Arc ('A'). INK colour can be changed at any time but PAPER has to be chosen at the time you first enter Precision Plotter. Over ('N') can be useful for correcting minor mistakes and there's a choice of cursor size - cross hairs for general use and a much smaller, single pixel, for precision work. Shift plus cursor keys moves the cursor at a much slower rate - again for fine, careful positioning. As on Melbourne Draw, the bottom two lines are used as an information window, showing the mode and x/y co-ordinates of the cursor. Here, however, the bottom two lines are not accessible. Should you return to the main menu and then back again to Precision Plotter, key '9' restores the current graphics screen to the display. This is stored in permanent memory, while the program is held in RAM, A COPY of the screen can be printed out on a ZX Printer and the display SAVEd to tape for LOADing later. Final option served up by the main menu is Screen Planner. This gives you the screen display created with Precision Plotter, together with the ability to call from any of the banks of UDGs. These are displayed on the screen with x and y co-ordinates (now for row and column) and INK and PAPER are available at any time; you can experiment with different attributes, although there doesn't appear to be any option to alter BRIGHT and FLASH at this point. Return to Precision Plotter (via the main menu) and you've now got your composite display to work on. The instruction booklet gives details of how to call on these SAVEd screens from various memory locations within your own programs. Remember, though, that each screen SAVEd under these conditions uses 6912 bytes. Print 'n' Plotter has a program - Screen Machine - that can save bytes on graphics screens; we'll be looking at that in a future issue. DRAWMASTER Campbell Systems £6.95 Campbell Systems is probably better known for its database and filing programs, but Drawmaster certainly offers a host of features. The program autoRUNs on LOADing to display a blank work screen with a two-line information window at the bottom (showing the current mode of the 'pen': Trans(parent), Draw, Erase or Over and the current attributes: BRIGHT, PAPER and INK (FLASH is not included - as is fairly obvious from the display). The x and y pixel co-ordinates are indicated in normal Spectrum fashion - that's 0,0 in the bottom left corner - and there's no way of using the bottom two lines of the display (which, of course, is the information window). Also shown are the current Line and Column (standard character cells) and pressing the 'Q' key gives what's called 'Menu' - in fact, a guide to which keys do what (a useful system of quick reference, and you can't lose it!). The direction of the 'pen' movement is controlled by keys '1' to '8', normal cursor directions and keys I to '4' are the diagonals. Caps Shift with one of these cursor keys moves the cursor eight pixels (in the Draw mode this would give you a dot every eight pixels) and allows rapid movement of the cursor. Key 'Z' gives fine control, with the cursor moving one pixel at a time (accompanied by a beep) and with the x and y co-ordinates being updated continuously. Other movement modes update the co-ordinates only when you stop. Drawmaster has several interesting features. You can define a particular point called 'X' (marks the spot - geddit?) on the screen and Draw lines or Arcs to it from any cursor position. You can draw from the cursor in any of the eight specified directions and they'll continue on until hitting another pixel - or, alternatively, the edge of the screen. The Window commands are also useful. They'll let you define a rectangular window, store this for future use, recall it, paint it with current PAPER colour, or re-define its position on the screen. Drawmaster can also Rescale any image and draw it elsewhere on the screen, either larger or smaller. In fact, the program's quick reference guide was obtained by copying normal Spectrum text and reducing it to 75 per cent of normal size. It's a time-consuming process, but one that greatly enhances the scope of the toolkit. To reduce or enlarge a portion of the screen - create a window around it, then use the Clear Window command to quickly erase the original once it's been copied. Text can be placed on the screen, but while in 'text' mode remember not to overwrite line 22 - the screen will scroll! Circles can be drawn at a specified radius about the cursor and, of course, there's the usual Fill command. The program allows screens to be SAVEd or LOADed to or from tape, but there are no user-defined graphics facilities available. COMPUTER AIDED DESIGNER Dream Software £5.95 Despite the 35-page booklet that accompanies CAD, there seems a notable lack of index or reference material to guide you swiftly through the functions and commands. To start with, it takes some searching just to discover (a) what it will do, and (b) how you do it. As usual, the program autoRUNs on LOADing at the same time showing the 'command' screen. The information window at the bottom displays the last command you gave, the current cursor position and the heading - the latter is selectable from a range of one to 16, and it defines the direction in which a line will be drawn .. .N, NNE, NE, ENE, E, and so on. For some unspecified reason, East is Heading 1, North is 13, South is 5 - not the most obvious of choices. To change direction, key 'H' and the word 'HEADING' will appear in the information window. Now press Enter to confirm that a change is in order, then key in the new number, followed by Enter; all rather long-winded and time-consuming. Most commands require a similar procedure. Jotter will plot (set) a pixel and here the cursor keys are used to guide your 'plot' (Shift plus keys '5' to '8'). However, to step over a pixel you have to key 'E' to end Jotter, press the 'K' key to enable cursor movement, move the cursor, and then key 'E' to end this command... ouch! The cursor provided is a very small square, consisting of one clear pixel at its centre. One might reasonably expect the clear pixel to represent the vital position from whence all can be drawn. Wrong! It's at the top left-hand corner!! CAD supports a number of useful design shapes: Cube, Circle, Facet (parallelogram), Rectangle, Square, Triangle and 3D Box. There's also an option to define the position of 26 ('A' to 'Z') points on the display of all or specific points, drawing lines between two or more points, shifting the cursor to a specified point and nominating 'automatic points' (where, for example, the corners of a subsequently drawn cube are automatically specified). If you reset (clear) all previous points - remember to 'display' points twice (first displays, then un-displays!) or you'll be left with unwanted letters all over the place. In addition to the design shapes provided above, there are routines that (a) allow the design of a shape from the display to be stored for future use and (b) UDBs (user-defined blocks), blocks of four character cells that can be created and used within your display. Both options can be SAVEd to tape - but only used thereafter with CAD. The second option, UDBs, provides a 24 by 24 grid on which to create your design. Cursor keys move the spot cursor and the Space key either 'sets' or 'resets' a cell... and continues to 'set'/'reset' cells to the right; this happens quickly and it's not particularly easy to act on one specified cell. Quick fingers and care are called for. But, a word of warning... a return to the main display screen ensures that all previous work is lost; remember to SAVE it first. Text can be placed on the screen and a Fill option fills a shape with the current INK colour. Erase removes the last command you made and Grid will display a 16-pixel grid pattern around the edge of the display area. Overall, CAD is an interesting program that's obviously been developed with specialist design work in mind; it's not a general purpose graphics toolkit.
Adding colour is not as easy as it may at first seem. Drawmaster has no special features to handle the attributes (colour) alone - they have to be stuck on when you alter the display file. It makes design work difficult if you always have to bear in mind the effect of colour at the same time as creating the shapes themselves.
Drawmaster was a very difficult program to use. It had all sorts of mega-amazing features, but most of them seemed pretty pointless to me. For example, there's a command called 'Hop' which allows you to draw dotted lines, and pressing the 'U' key changes all the INK to black, and all the PAPER to 'dull' white. Wowee!
The finished flag - messy maybe, but I was getting more and more frustrated with a program that was getting very awkward to manipulate. If you're reading this out in Korea, please don't send letters of complaint about the state of your flag - I did my best!
Advert15
- ZX Computing #13Jun 1984 · p.70
- Your Computer #5May 1984 · p.168
- Sinclair User #25Apr 1984 · p.108
- ZX Computing #12Apr 1984 · p.115
- Your Computer #3Mar 1984 · p.207
- Your Spectrum #2Mar 1984 · p.46
- Sinclair User #24Mar 1984 · p.22
- Your Computer #2Feb 1984 · p.170
- ZX Computing #11Feb 1984 · p.96
- Sinclair User #23Feb 1984 · p.110
- Your Computer #1Jan 1984 · p.33
- Sinclair User #22Jan 1984 · p.106
- Sinclair User #21Dec 1983 · p.56
- ZX Computing #10Dec 1983 · p.97
- Your Computer #12Dec 1983 · p.243
Feature1
- Your Spectrum #8Oct 1984 · p.36
Reviews from people here
Sign in to write about this, or make an account. It takes a minute and lets you correct the catalogue too.
No credit, tag recorded.
Sign in to correct or add to this.
Hold the rights to this and want it taken down?